Showing posts with label software. Show all posts

Sunday, September 29, 2019

Day 29 - Evening Stroll


I may have said it before, but I use a plug-in program with Photoshop, called "Nik Collection". One of the best things about it is that it allows you to save recipes for editing, and by now, I have a fair amount of them. So instead of tweaking everything from scratch, I can use a recipe, and that adds a bunch of adjustments (sort of "layered" on top of my image) and then just tweak those adjustments  to my liking and add one or two more on top. If RAW is the yin to my editing, the plug-in is definitely the yang. I started using it a few years back when it was free, and now I don't want to be without it.

/MrsHjort

Sunday, June 9, 2019

Day 40 - Loose Canon

This is another shot of a place that I think has wonderful natural lighting. And I have to say, it's much more fun to shoot in places like this nowadays compared to a few years back, before I got post-ed software that could handle the raw format. It still amazes me how much more detail you can get out of a high contrast environment. The two step editing (Lightroom - Photoshop) takes a bit longer than just using one program but it's so worth it, and I'll never go back to just using jpg. No more cross your fingers and hope for the best, the loose jpg cannon  Nikon has been fastened and is now operated by an artillerist ;).

/MrsHjort

Thursday, June 28, 2018

Day 28 - Coral Bells

Photoshop decided to die on me just as I was finished editing this. It made me swear a bit :P. But in the end I like this version better than the first one I made, so no harm no foul ;).

/MrsHjort

Wednesday, September 6, 2017

Day 6 - Up the Alley


So, today I tried out the lens correction tools in Lightroom, and as you can see, they work just fine. Compared to Photoshop's tools I would say they definitely work just as well. I did use the automatic crop though, and I think I'll avoid it next time - it left me with a slightly different composition than I started with. There's nothing wrong with what it left me this time, I actually think it's stronger, but I prefer not to have the software do the thinking for me - my picture, my composition :).

As for the post processing, it was quite simple this time - I mainly worked on enhancing the textures and colors - trying to make it look slightly less bland than what I started with, but not too wild. The sky was a no-go though, there simply wan't anything there to work with at all, so I had to fake it. I've been tweaking the color gradient a lot, and it took me a while to settle on this. I was constantly switching back and forth - is it too saturated, too dark, too blue, too grey? Finally I used the pipette tool, grabbed the color from the cobbles and chose a lighter more saturated nuance for the top gradient marker. I think I got it right... but then sometimes, when you go back to a photo later it's like "what was I thinking!?" Haha, I guess we'll see ;)

Cheers
/MrsHjort

Saturday, September 2, 2017

Day 2 - I Love Raw


I remember back in the day when I used to shoot in jpeg... Oh my... how happy I am that those days are gone. Back then, I wouldn't even had bothered trying to save this shot - there are just so many problems with it. I shot this in the morning, and even though the sun was shining, it didn't reach down to the narrow streets of Bergamo. The bright sky and dark alleys made for horrible light conditions. But raw is awesome, Lightroom is too and after a lot of tweaking I'm finally happy with this image.

In Lightroom I dragged the highlights down a lot, and the shadows up a lot. Then I enhanced the clarity and contrast. In Photoshop I ran my lens correction routine, cloned away the sign on the left and then moved on to Nik's color filters. I used detail extractor, contrast color range, skylight, cross processing and Indian summer (to add red). I then added a few selective hue/saturation layers to tweak the sky (too grey), the rooftops (annoying purple/green) and the cobbles (too blue). Lastly, I burned a few of the shadows a bit to make the contrast look the way I wanted it to and desaturated the skin tones of the pedestrians. It was the longest time I've spent on a single photo in a long time, but the end result makes me happy :).

/MrsHjort

Tuesday, September 27, 2016

Day 27 - Clock Tower

I love the way the sky turned out in this picture. Who would have thought, looking at the original? I love the way the Nik collection brings it all out. I wish I had discovered it earlier, and sometime I think about going back to re-edit old shots. There's just that usual pesky issue of time... Sometimes I wish there was more hours in a day.

This clock tower has already been in two pictures this month (day 5 & 8), though each of the shots were taken from a different angle, so I hope it's too repetitive. The building is just so pretty, it's hard to resist shooting it. It reminds me a bit of Big Ben for some reason, though I realize that the architectural styles are completely different. But they're both close to bridges and they're both part of a larger building in the same style. This one may not be as big, but they're both beautiful landmarks :)

/MrsHjort

Tuesday, September 20, 2016

Day 20 - Skyline


I experimented my way through the post-ed of this picture, now knowing where I was going... just trying stuff out, layer after layer. If I thought the result was better, I kept it, otherwise, I threw it away. The colors kept bothering me, until I finally thought to go with a less natural color treatment. It turned out to fit the shot much better, yey! Though, this is probably one of those shots that Mr would call "too yellow" or "painterly" haha. But I like it. I hope you do too :)

/MrsHjort

Sunday, September 11, 2016

Day 11 - Royal Scots Greys


This is an other one of those shots with a blown out sky.... Gargh! I hate it when that happens! An overcast sky is hard to manage, and sometimes I forget to think about that... especially when I've been walking around all day and can't wait to get "home" to where I hung my hat that particular day. Thankfully, I've made progress with my "sky-fixer technique" using the "clouds" function under the filters menu in Photoshop. I figured I could use the perspective transform tool in order to create the correct distortion, and as you can see, it worked out quite well. It may not given me the natural details of real clouds, but at least it brings me a close enough approximation and it looks much better than it did before. So, I'm happy... at least for the time being. I'm thinking hard on how to make the effect more life like; maybe I could add some kind of ripple effect selectively, but I'll have to think on that some more before I start experimenting. No doubt the solution will come to me during the night...

Sleep tight :)

/MrsHjort

Friday, September 9, 2016

Day 9 - St Mary's Cathedral

This is the beautiful Cathedral of St Mary. I never got the chance to go there during my last visit to Edinburgh, so this time I just had to. It didn't disappoint, going there was like love at first sight. I absolutely adored the architecture and I could have spent hours there, just experimenting with camera angles and composition. Unfortunately, we only stayed in the city for two days, and Mr was anxious to move on to see more things, but I managed to get a shot or two... or 50 haha :)

I have waited with this shot deliberately because I had to think about what to do with it. As you can see in the original below, the light areas of the sky were totally blown out and I had to create a (to me) whole new approach to deal with that. As usual the solution came during the night. That's when I came up with using the Clouds filter, and it worked! Yey!

On an other note, I'm happy to tell you that our work in the garden is nearing the end. A day or two more, and our garden will be tucked in and ready for winter. Yey! That means more free time for Mrs!

/MrsHjort

Tuesday, September 6, 2016

Day 6 - University of Edinburgh


Editing this was a bit of a pain. It was hard to find a good balance between the dark bricks, the sky and the green foliage. It took me about twice the time it usually does, because I had to do a lot of small adjustments in order to get things right. Not many steps, mind you, just a lot of tweaking of the steps themselves. I love that the Nik collection gives you so much control though. I haven't used it for very long, but already I can't imagine going back to what I used to do.

This shot is of the University of Edinburgh. Last time I was in the city, I spent a lot of time at the university. Sadly, I didn't get the privilege to see the inside of this building - I was at the newer university, further down the hill. It was a very interesting time though, I got to meet so many smart persons and listen to many interesting lectures. I'm so glad I took the chance and went there, that fist time. It made me fall in love with the city, it's why I came back, and I loved to get to share it all with Mr this time (and to get to shoot it for real).

/MrsHjort

Thursday, September 1, 2016

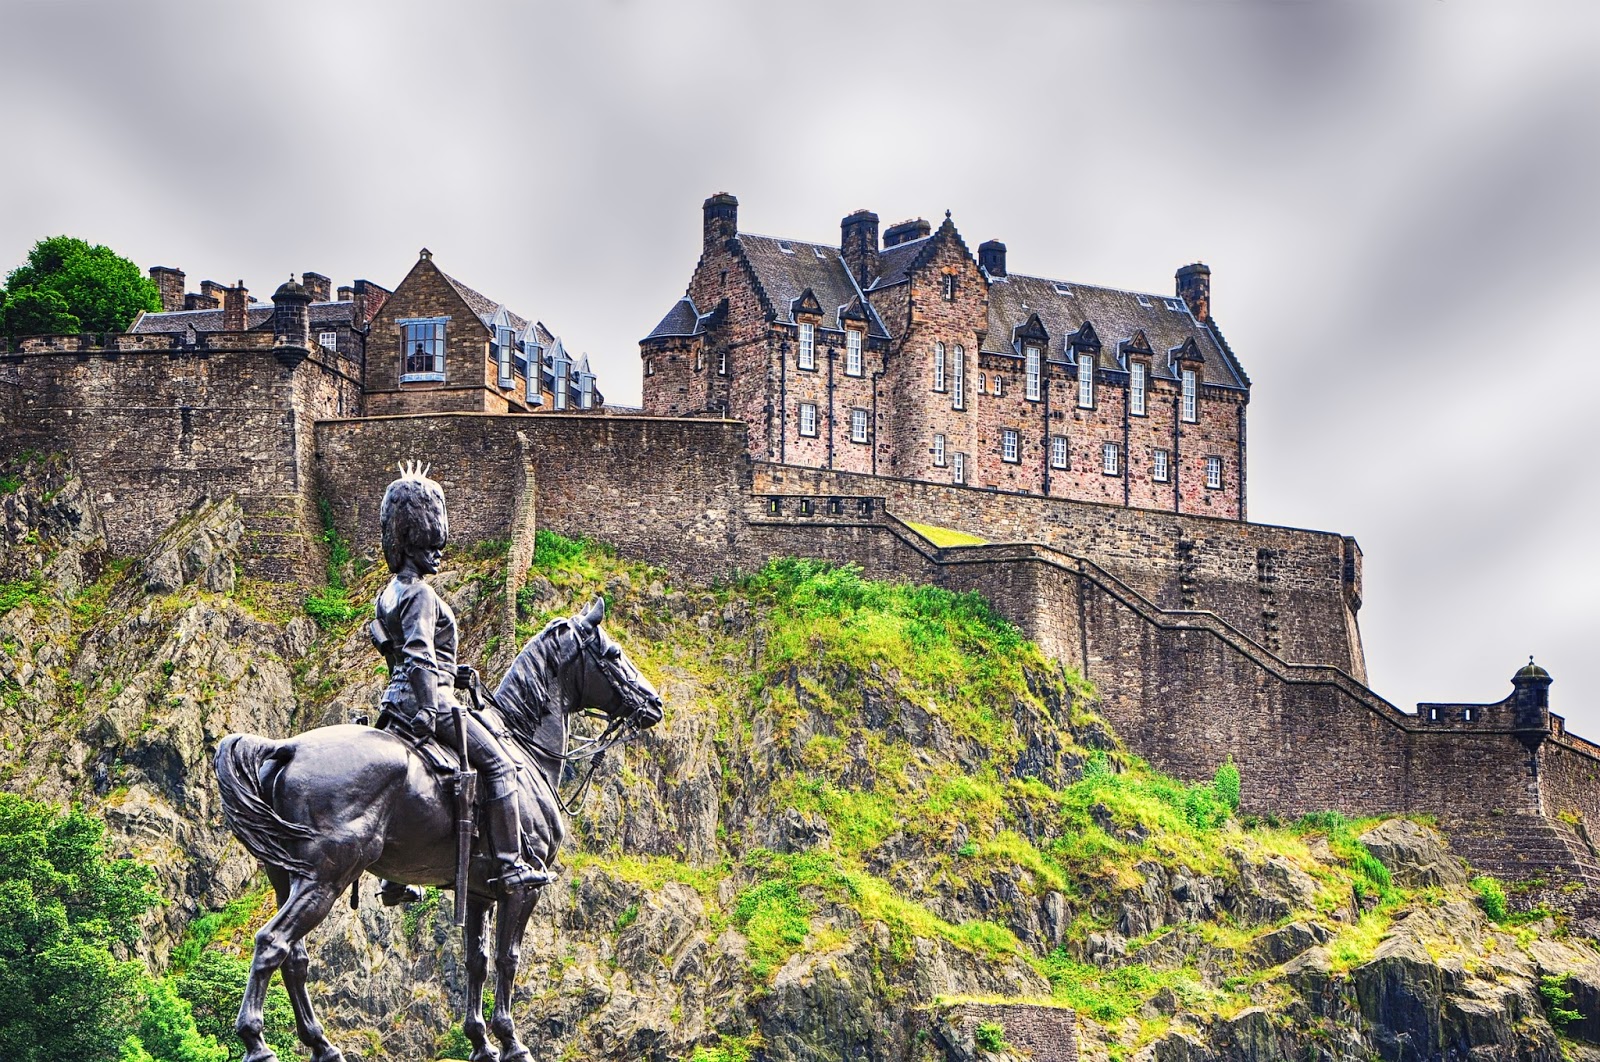
Day 1 - Edinburgh Castle


This next series of mine will show you the beautiful city of Edinburgh. Mr and I went there for a few days this summer, and did all of the usual touristy stuff, but on steroids! You see, I've been to the city before, but back then, I didn't get to do any real touristy stuff – I wasn't there on holiday and my schedule was packed. So, this time I wanted to do all those things I didn't get to do last, and shoot all of the things I didn't have the time to shoot back then. Needless to say, I had a blast! I love Edinburgh and all its wonderful traditional stone architecture, I love the cozy pubs, the friendly people, the charming lilt of their Scottish accents and the smoky whiskey they serve. If ever I were to settle down outside of Sweden, Edinburgh wouldn't be a bad choice :)

I'm learning so much during this challenge of ours! By post-editing all these different shots every day I'm getting to know the Nik collection much better. Strangely, I've been ignoring one of it's many wonderful functions up until now. I guess I've been focusing on geting to know things one at a time, it's just how I roll, but now I've finally tried out the HDR tonal mapping, and it rocks! Before, I've used the detail extractor for the same purposes, and removed stuff selectively after hand, trying to make all the layers blend nicely (it's a pain in my self critical left eye), but the HDR function is vastly superior to that. Just look what it brought out of that uncooperative sky! Color me impressed!

Cheers

/MrsHjort

Friday, August 26, 2016

Day 26 - View from the Castle


I shot this from a vantage point close to the castle of Chateauneuf en Auxois, overlooking the canal and one of the small villages near by. It's a charming landscape, but as always, it comes off as flatter than it really is when you see it like this. There are more hills to this area than you can tell from looking at this shot. Boy, do I wish I had the ability to bring out the beauty of the rolling landscape and show it like it was. I'll just wait patiently for the "holographic imager" to be invented I guess...

I did a lot of editing to this shot, obviously. Off the top of my head I used, Levels, Detail Extractor, Bleach bypass, Contrast color range, Cross processing, Graduated filters, Foliage, Skylight, Tonal contrast and then a slight lightening of the center. Oh, and a noise reduction - since all that tweaking bought me some free grain. I think that's it... It took me a while to get the look I wanted. As you can see, the original is quite bland, and the clouds were casting shadows over the landscape, making it look dull and colorless. This enhanced version is closer to what it really looked like, though of course I've taken some artistic freedoms, but then that's what we all do in post-ed isn't it? Spice it up a bit to make things a more beautiful :)

I hope you like it.

/MrsHjort

Friday, August 5, 2016

Day 5 - The Ladies


Yey! Things are moving forward! I've had two epiphanies since yesterday - I've figured out a new way to reduce noise selectively using the Nik Collection, and a new, much faster way to fake a narrow DOF.

Let's deal with the noise first. Sometimes, the name of a thing can blind you to the effect is has. The Nik Collection includes a filter called Dynamic Skin Softener that reduces texture in, you guessed it, skin tones. But, you have the ability to redefine what should be accounted as "skin", which means that you can soften any color you like by using the pipette tool. Neat huh? That helps a lot when changing a portion of an image drastically, like say when you use the Detail Extractor to bring out a sky and it becomes "too noisy". I wish I had figured that out sooner.

Next, lets talk about the fake DOF. Before, I used do that in a very time-consuming way. I used the lasso tools to select the portion I wanted to keep sharp, copied it and put it on a new layer. After that I  went back to the base layer, cloned the areas close to the "copied part" and painted over it to minimize the bleed effect that blurring an image creates - otherwise I would end up with a give-away fuzzy "halo" around sharp area. Today I figured, why not simply cut the subjects out instead? That way there would be nothing left on the base layer to bleed from. As you can see, it worked beautifully! Tough, I had to copy the base layer three times, blur three of layers and keep a sharp one in the back so that there wouldn't be any "sharp bleed" or transparency (am I making sense here? I hope I am).

So there you have it. My two new methods, I hope they're useful to you too.

/MrsHjort

Wednesday, August 3, 2016

Day 3 - The Smiths

There are many different layers of post-ed to this photo. I wanted to brighten the original, but keep the dark areas close to the fire in order to contrast the flames against it. So, the first thing I did was a Bleach Bypass to brighten things up a bit and then cut away the bottom part to keep it dark. That's how you have to work with the Nik Collection, since the adjustments are global and applied to your image as it is displayed on you monitor, regardless of what layer you're on.

Next, I enhanced the fire with Contrast Color Range to get those marvelous fiery colors, and then cut away everything but it (the rest obviously got too wild). After that I hid the fire layer (since it was perfect), and did another contrast color range layer on the rest in order get it right. Then I reordered the fire-layer to put it on top and showed it again. After that, Detail Extractor and Skylight. Then I reduced the noise, sharpened and reduced the noise again. Two additional layers with a slight dark vignette (curves) to the right and top and I was done.

/MrsHjort

Thursday, July 14, 2016

What Makes a Good Photo


"What makes a photo great?" Just recently I got asked that question by a friend. "Is it the photographer, or the post-ed?"

Nowadays, many are under the impression that anything, yes anything, can be done in post-ed. Any old ugly photo can be turned into a slam dunk using Photoshop, so what does the photographer matter? Well, yes, much can be done, but the real answer is that a great photo is the making of the photographer, and the post-ed. Both are crucial to the end product.

There's no getting around that you need a good eye to get good photos. Composition is the foundation of photography and it's the very raw material of a great shot. For instance, beginners often get caught up with the main subject. They might forget a busy distracting background, or fail to notice that the horizon isn't level, or that the lighting isn't flattering. These things make all the difference, and no manner of post-ed can save bad raw material. Much can be done in post-ed, that's true, but it can't work miracles.

If you have a good place to start from though, post-ed can be the icing on the cake. Take a look of the before and after pictures to the right and you'll see why. Both examples are exactly the same shots. Nothing has been removed or added, only enhanced! As you can see, a good eye isn't enough. Cameras have their limitations, and no matter if you have a cheep or fancy one, shots never come out quite like what you see with your own eyes, or like what you wanted them to be. But, you can compensate for this in post-ed, if you know how.

If I had a nickel for every time I shot something I thought looked glorious and it turned out to be flat and boring once I saw the result on screen... So many disappointments... Five years back, I'd just sigh and let the shots gather dust on my hard drive. But now, that I know how, I can do something about it!

It's fun to browse through those old photo folders... Sometimes I find those shots that disappointed me years ago, like the ones I'm showing you today. Then I fix them up and make them into what I envisioned they would be the moment I shot them. Great fun!

So you see. A beautiful photo really isn't a result of one thing or the other, but the combination of the two. You need both skill-sets; the skill to get good raw material, and the skills to tweak them in post-ed.
That's the yin and yang of photography :)

/MrsHjort


Sunday, May 22, 2016

Blossoms, Blossoms Everywhere


This spring may be late, but oh so lovely. It's been so long since I've seen this many blossoms in the trees. The weather is lovely and nature literary is exploding with colors. Wonderful! Unfortunately the weeds have also awoken and my back aches from pulling up what feels like a gazillion weeds from the strawberry plantation in my garden. If I had a super power I wish it was the ability to conjure away all the weeds... and the dust that gather inside my home haha - you wouldn't believe how fast cat hair gathers in the corners during springtime, when the cats shed their winter coats!

On an other note, I'm still having fun with the Nik Collection. In the beginning I played with it like a kid who first discovered Word Art haha, but now I'm trying to go for more natural looks. I have to say I'm impressed with what the software can do. It's wonderful how much detail the filters can extract from what looks like plain monotone areas, and I love the skylight filter, it's a life saver on cloudy days. The only beef I have with the software, is that it often creates a bit of grain in soft backgrounds. The reduce noise filter helps a bit though, but boy would I love it if I could keep the smooth soft background and still have that edge the Nik Collection provides. Oh well, you can't have everything I guess...

/MrsHjort

My Father, a Tribute to a Kind Man

This blog post is going to be longer than usual, and even so, how can one summarize one's feelings and memories of a person within the p...